
Content and analysis made possible thanks to support from https://headphones.com, and https://patreon.com/goldensound supporters.
This unit was loaned to me by a friend to test
ChitChat:
The Crane Song Solaris is a rack-mountable DAC aimed at the pro-audio market.
Crane Song Ltd manufactures various products for all stages in the mixing and mastering process and are far from an uncommon sight in these environments.
But whilst their other products such as the Ibis EQ, or Falcon tube compressor are items you’d typically only see in these professional environments, the Solaris DAC has gained something of a following in some audiophile circles.
After all, being a professional oriented product might mean the form factor isn’t particularly conducive to use on a desk, but fundamentally the Solaris is no different than any other DAC that a high end audio enthusiast might purchase such as the Gustard X26 Pro or Chord Qutest. And if the sound quality is there, why not?
In fact, several other professional DACs such as the Dangerous Convert 2, or Burl B2 Bomber, have also gained a notable following amongst audio enthusiasts.


Design:

The Solaris is based around the AKM 4490 chip, with two sets of balanced output, and a single ended headphone amplifier on the front of the unit.
There are no RCA outs, primarily because in a professional environment these are rarely used.
The Solaris does have some unique features compared to other DACs.
First is the usage of a stepped attenuator, which allows for control of the output level from the main outputs up to a maximum of +24dBu (12.3Vrms).
This is a genuine analog stepped attenuator, NOT DSP volume control as seen in most consumer DACs, and this can help to prevent loss of performance or dynamic range due to digital attenuation, as will be demonstrated later in this post.
This attenuation is done through the use of a laser trimmed attenuator IC, rather than a discrete set of relays/resistors.
The secondary outputs however, have a fixed output level of +18dBu (6.15Vrms) and do not change regardless of the set volume level on the main outputs.
The headphone amplifier also has its own stepped attenuator.
One design aspect that is heavily focused on in the marketing material and product pages, is the PLL/Jitter reduction in the Solaris, which Crane Song calls their ‘Quantum’ clocking system.
Many manufacturers have made claims of being ‘immune’ to jitter before, but failed to live up to this claim in testing, even if they are incredibly resistant to jitter.
And Crane Song is also doing a similar thing to many manufacturers, where their talking points about jitter are all referencing the performance of the clock itself, rather than the actual DAC as a whole.
Having a clock with sub-femtosecond accuracy is great, but there are plenty of DACs with incredible clocks that end up having mediocre jitter performance, because the clock itself is just one part of the design and implementation.
Measurements:
Test Setup:
– Audio Precision APx555 B-Series Analyzer with 200kOhm input impedance set unless otherwise specified
– USB Source: Intel PC via intona 7055-C isolator
– All measurements shown are with the DAC connected via AES unless otherwise specified
– Measurement setup and device under test are running on an AudioQuest Niagara 5000 power conditioner
– Audioquest Mackenzie XLR and RCA interconnects
– Intona Reference Impedance Characterized USB Cable
– Audioquest Carbon SPDIF and AES cables (1.5m)
– Exact analyzer/filter configurations for each measurement are detailed in the full reports
Jitter Reduction/PLL:
Before we look at the bulk of the measurements, I want to test out the main selling point of the Solaris, the PLL.
Looking inside the DAC we can see quite a bulky set of components for the clock, temperature control, and filtering of power to the clock, so it’s immediately clear that they’ve put quite a lot of work into this area.

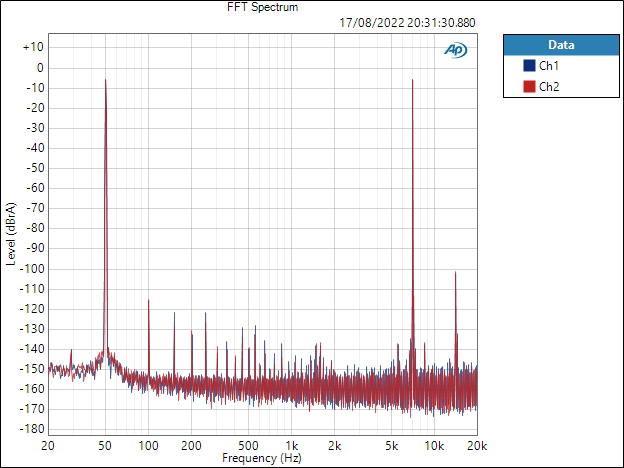
I started by connecting the DAC via AES from the APx555 Analyzer (as this is the connection most likely to be used in a professional environment), and ran a J-Test through the DAC, which shows us time domain/jitter problems on a frequency domain FFT.
‘Perfect’ jitter would show up as just the fundamental, with no other spikes, and as low a noise floor as possible.

Jitter performance is not perfect, with some clear sidebands visible, but all relatively low. This is not the 0.045ps jitter performance referenced in the product page, because as mentioned before, the clock itself is only one part of the equation.
So then, how does the PLL (jitter reduction system) fare when faced with a jittery/poor quality source?
I started by applying my usual 10ns of 1khz jitter to the clock signal.
For comparison, the image below shows how a typical DAC such as the Schiit Yggdrasil (which also has a quite effective PLL) changed when applying this same type and level of jitter (note: fundamental is at 12k on the Yggy cause it was tested at 48khz in this comparison, but change was the same for 44.1khz and 48khz):

Low Jitter SPDIF source on left
10ns 1khz Jitter applied to source on the right
Quite a lot of jitter showing through, which is fairly normal for most DACs.
And now this is the Solaris:


This is pretty incredible. Almost no change in jitter whatsoever even with this extremely high level of jitter from the source!
This had me curious, how much torture could the PLL take? And so I set the analyzer’s jitter generator to a noise waveform instead of a sine, and at the maximum level (40ns), as this is typically the hardest type of jitter for a PLL to effectively reduce..

Usually most DACs would not even be able to lock to the signal at this point, but not only is the Solaris locking just fine, jitter performance is still basically identical!!!
Setting it back to a 1khz sine jitter waveform, which the APx555 can apply higher jitter to (1.592us), we finally start to see a little bit of phase noise showing up, represented by the widened base of the fundamental.

This is an incredible level of performance in a PLL, and I can only commend Crane Song for managing to achieve this.
It’s a shame that the base jitter performance isn’t a little better, as if those unwanted spikes were eliminated, but this same jitter attenuation performance was kept, it’d be pretty incredible.
There is one caveat to the jitter performance though: Don’t use USB.
When using USB, jitter performance was notably worse:


As you can see, considerably poorer performance here. You are better off using ANY SPDIF/AES source if you can, not USB. I’m not sure why the USB input performs so much poorer given the incredible PLL performance, but regardless, best off using SPDIF/AES if possible.
Full Measurement Reports:
Reports available here:
Dynamic Range (AES17): 113.1dB
SNR: 113.2dB
IMD SMPTE: -99.9dB
Noise Level RMS (20-20khz): 16.05uVrms
Noise Level RMS (20-90khz): 27.87uVrms
DC Offset: 3.1mV active, 3.5mV idle
1khz Sine, Balanced Out (Main Output, No Attenuation):

Performance seems to be quite good, though one unexpected aspect is that as well as the typical even/odd order harmonics, there is also some distortion present at non-multiple frequencies, such as about 2.7khz and about 6khz. I’m not too sure what might cause this. However even at full output they are below -130dB so likely not a concern.
As mentioned earlier, the Solaris has an inbuilt stepped attenuator, which allows you to reduce the output level without the use of digital volume control. This means that you can in theory retain more dynamic range or effective bit-depth, so let’s have a look shall we?
1khz Sine, Balanced Out (Main Output, 20dB Digital Attenuation):

When applying 20dB of volume reduction with digital, dithered volume control, we lose about 13dB of THD+N.
So what happens if we use the stepped attenuator?
1khz Sine, Balanced Out (Main Output, 20dB Analog Attenuation):

Now we’re only losing about 6dB of THD+N! So overall better performance than digital attenuation.
If you need to reduce volume, or tame the hot outputs of this DAC, use the inbuilt attenuator, not a digital volume control.
-90.31dBFS 1khz sine (96khz capture bandwidth):

The dynamic range of the Solaris isn’t the highest, so low level signals could be a bit cleaner, but still quite good.
Filter Ultrasonic Attenuation:

The Solaris does not use the inbuilt AKM reconstruction filter, but is instead using a proprietary reconstruction filter. There is little information given on this, but we can see that it has a little over 90dB of attenuation, but doesn’t attenuate fully before the nyquist frequency (22.05khz). Depending on how objectively correct you might want your chain to be, or personal preference, you may wish to experiment with external oversampling.
Idle Noise FFT:

THD+N vs Frequency:

THD+N does rise notably into the higher frequencies.
IMD:


Linearity:


Crosstalk:

Multitone:

Intersample Overs Test:

The Solaris does not have any internal digital headroom, and will clip in the presence of any intersample overs. It may be beneficial to set your player volume to -3dB to ensure no clipping occurs.
Wideband:


Hi, one question: how long did you have the Solaris powered on for before running the tests?
Also the ultrasonic reconstruction filter is “a unique combination of analog and digital reconstruction filters” (as mentioned in the manual), after much testing by Dave Hill.
Thank you for these measurements, Goldensound. Love your work.
I am dabbling with the idea of grabbing one for use with a SE tube amplifier and am wondering whether attenuating the signal inside the Solaris and using a 1:1 XLR to RCA transformer or XLR to RCA adapter cable into an SE tube amplifier would work.
More specifically, rummaging through the Solaris manual online, which ATT or AVO value with or without the pad for 18 dBu would it have to be set to for around 2 – 2.1 vRMS?
I just can’t seem to figure out the correct value; sorry for the bother.
is this the newer 5th gen design from crane song? How does the DAC in Solaris compare to Interstellar and HEDD quantum ?